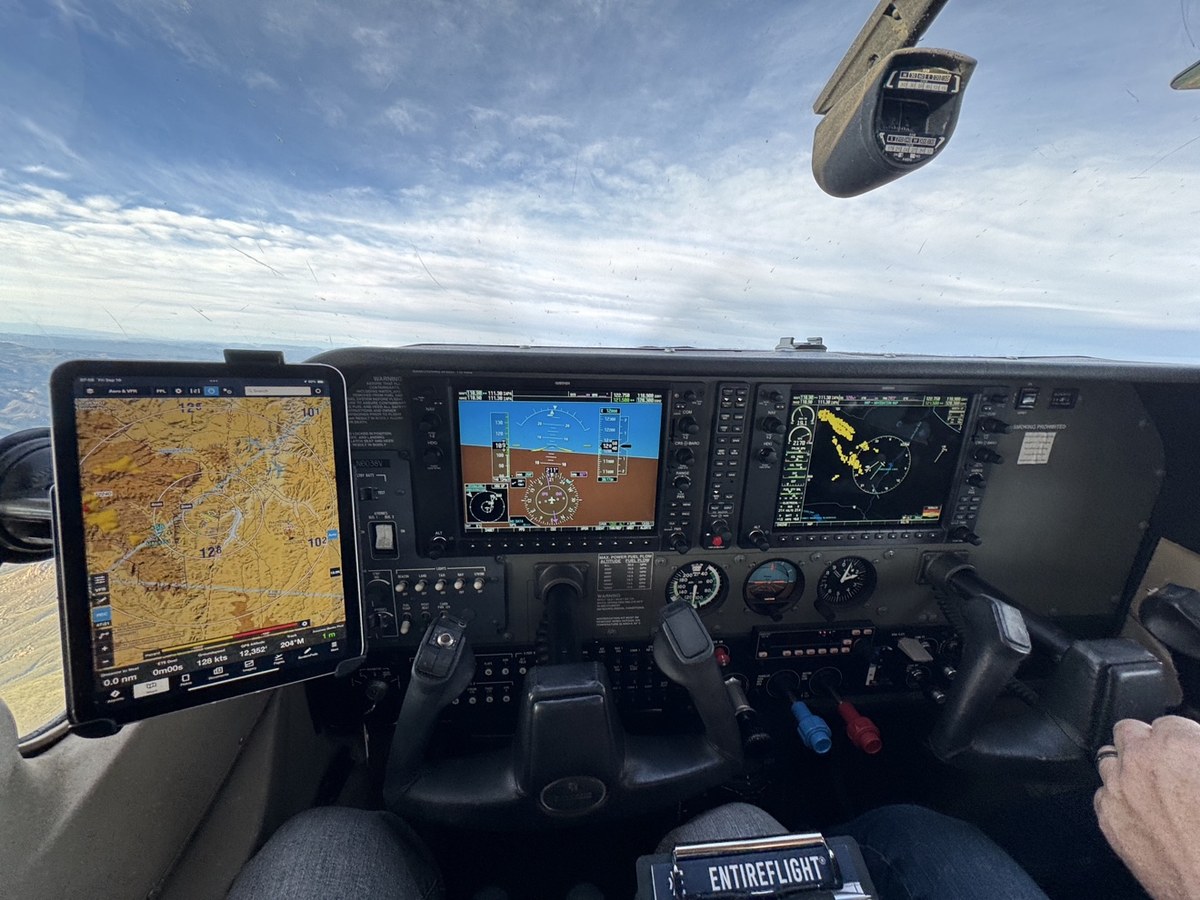
Filming a flight: glasses, comms audio, and a 360 camera
Three gadgets, one flight, and a Short your CFI will actually watch. The full setup, the sync trick, and the edit.
I fly a G1000 172 out of Centennial, and I wanted video of it — the real kind, where you can hear the radio calls and see where my eyes were actually looking. Three gadgets do the whole job: Meta glasses for the point-of-view shot, a cable that records clean intercom audio to my phone, and an Insta360 X2 for the everything-at-once shot. One flight, two finished products: a private debrief cut for my CFI, and a 30–60 second Short for everyone else.
One rule governs the whole setup: the airplane comes first. Everything here is set-and-forget. If any piece of gear needs your attention in the air, it waits until you’re on the ground.
The kit: three sources, three jobs
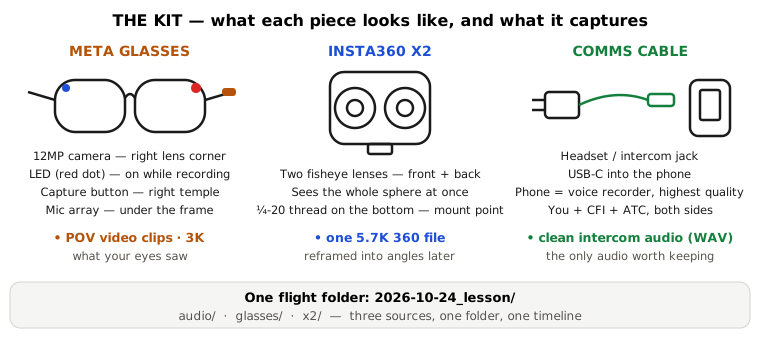
Meta glasses — the POV camera. Takeoff, landings, the maneuver itself, anything where your eye line is the story. The head-tracked view is also the best debrief footage you can get: it shows your CFI exactly where you were looking. Highest video quality (3K), stabilization on, “Hey Meta” off — voice triggers misfire on cockpit chatter. Shutter button only.
Battery reality: roughly 45–60 minutes of continuous recording, and the glasses heat up after about 20 minutes straight. Plan segments, not marathons. The case recharges them between flights.
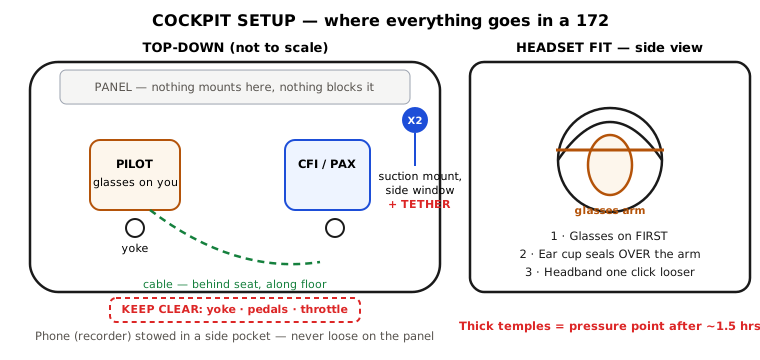
Glasses go on first, then the headset down over them. Wayfarer or Headliner frames sit flattest under the ear seals. Loosen the headband one click from your no-glasses fit.
The LED lights whenever you’re recording, and on Gen 2 and later the camera disables itself if the LED is covered. Tell your CFI and any passenger you’re recording before engine start. The light makes it visible, not secret.
Insta360 X2 — the 360 camera. Everything at once. A 360 camera doesn’t need aiming — you choose the angle later, in the edit. One X2 in the cockpit gives you the panel, the view out the window, and your hands, all from one file. 5.7K 360, 30 fps, FlowState stabilization on.
Suction-cup mount on a side window or a clamp on the glareshield edge are the usual spots. Two rules: it must not block your view or the panel, and it gets a tether. A suction cup coming loose in turbulence turns a camera into a projectile. Check with your school or CFI before mounting anything in a training airplane.
About an hour per battery in 5.7K, so carry a spare and a formatted card. 360 files are big — roughly 1 GB per 5–8 minutes. Check free space before every flight. And the twin fisheye lenses scratch easily, and a scratch is in every frame. Lens guards on until you’re mounted, microfiber only.
Comms cable — the audio. A cable from the headset/intercom jack to your phone’s USB port, recording everything on the intercom: you, your CFI, and ATC. It is the only audio in this kit that is actually listenable. Glasses mics under ANR pick up engine drone; the X2’s mics pick up the same. Cable audio is clean, intelligible, and it’s what makes a clip feel real instead of noisy.
Any plain voice-recorder app on the phone, set to its highest quality (WAV if offered). Start it first, stop it last — it is your master timeline.
Cable routing is the safety-critical part: behind your seat and along the floor, clear of the yoke, rudder pedals, throttle, and trim. Nothing may dangle where a foot or hand can snag it. If you can’t route it cleanly, don’t fly with it that day.
Where everything goes
Before the flight
Do all of this on the ground, in the hangar or at the tiedown, before you touch the checklist.
- Charge: glasses + case, X2 + spare battery, phone. Format the X2 card if it’s near full.
- Clean: glasses lenses and both X2 fisheyes, microfiber only.
- Test: a 10-second test clip on each camera, played back. Confirm the X2 isn’t fogged and the glasses aren’t smeared.
- Settings check: glasses — “Hey Meta” off, highest video quality. X2 — 5.7K 360, 30 fps. Phone recorder — highest quality, and confirm the cable is actually recording (watch the level meter move while you talk).
- Consent: tell your CFI and any passenger you’re recording video and intercom audio, and what it’s for (debrief + content). The glasses’ LED makes recording visible; the X2 and cable don’t announce themselves, so say it out loud.
- School policy: if it’s a training airplane, confirm your school is fine with mounts and recording. No mount goes on until that’s a yes.
- Fit order: glasses first, then headset over them. One click looser on the headband.
- Mount + tether: X2 mounted, tethered, and given a firm tug test. Cable routed behind the seat and along the floor.
Sterile-cockpit rule for this kit: nothing gets touched below 1,000 ft AGL, in the pattern, or on takeoff/landing roll. Everything is started on the ground and stopped on the ground. If a camera dies mid-flight, it stays dead until shutdown. If anything distracts you, it comes off.
Recording: the order matters
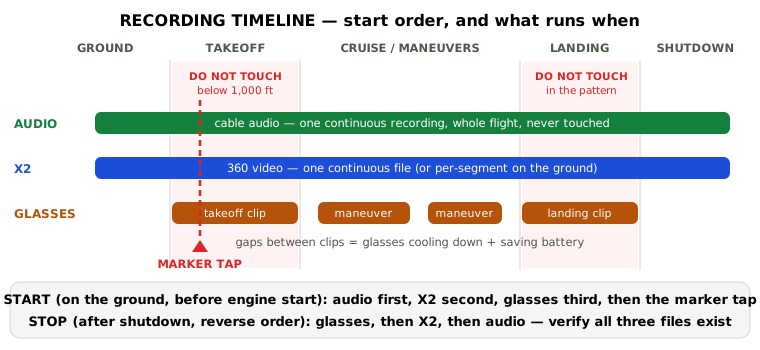
Start in this order, stop in reverse. The audio recorder is the master clock everything else lines up to.
- Start the audio recorder. Phone stowed, cable connected, levels confirmed. This runs untouched for the whole flight.
- Start the X2. One press, confirm the recording light, then hands off.
- Glasses: first clip at takeoff. Press and hold the capture button before you call ready for takeoff. Record the takeoff and climb, then stop the clip when you’re settled in cruise or between maneuvers.
- The marker. Once everything is rolling, tap the panel twice with a knuckle and say the slate out loud: date, tail number, lesson (“steep turns, power-off stalls”). The tap is visible on both cameras and audible on the cable audio — it’s your sync point.
- Fly the airplane. New glasses clip per segment you care about: the maneuver, the approach, the landing. X2 keeps rolling. Touch nothing below 1,000 ft or in the pattern.
- After shutdown, stop in reverse: glasses, then X2, then audio. Before you walk away, confirm all three files exist. A missing file discovered at home is gone for good.
What to shoot for content vs. debrief: the debrief cut is the whole maneuver, uncut, with cable audio. Your CFI wants the setup, the mistake, and the correction — not the highlight. The content cut is the 10–30 seconds around the interesting moment: the gusty crosswind landing, the first solo pattern, the view over the Front Range. Everything else is B-roll. Shoot once, cut twice.
Syncing: the step everyone skips
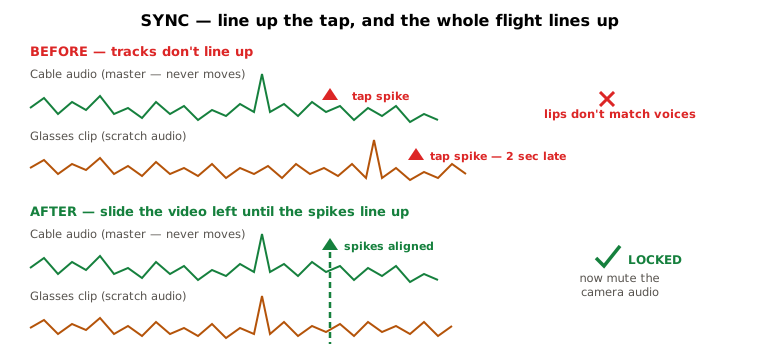
Three files, three clocks. Without a sync step you get video of a landing with audio from cruise. Do it once per flight, right after import, before any cutting.
- Import everything into one project folder named
YYYY-MM-DD_lesson(say,2026-10-24_steep-turns). Inside:audio/,glasses/,x2/. - Lay the cable audio down first. It is the master timeline and it does not move.
- Auto-sync each video clip to it. Most editors (Premiere, DaVinci Resolve, CapCut desktop) have “synchronize by audio waveform.” Point the clip at the cable audio and let it match. The glasses’ own scratch audio and the X2’s onboard audio are what the waveform matcher listens to — do not mute or strip them until after sync.
- Verify with the marker tap. Scrub to the tap: the knuckle hit on video and the spike on the cable audio must land on the same frame. If auto-sync drifted, nudge by hand until they match, then lock the tracks together.
- Only now mute the camera audio. Mute (don’t delete) the glasses and X2 audio tracks so you can re-sync later if needed. The cable audio is now the only sound in the timeline.
If a clip won’t sync, fall back to the slate. Find the moment you said the lesson name out loud on the cable audio, find the same spoken words on the camera’s scratch audio, and line those up by hand.
Post-processing: turning three files into a video
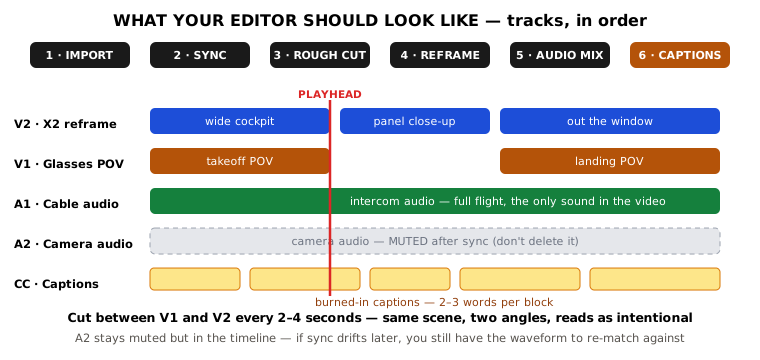
Work in this order: import, sync, rough cut, reframe, audio mix, captions and color. Skipping ahead (color before sync, captions before the cut) is how edits get redone.
Rough cut — story before polish. A Short is one idea: one landing, one lesson learned, one view. If you can’t say the idea in one sentence, you have two videos. Lead with the moment: the first 1–2 seconds are the hook — the gust rocking the wing, the touchdown, the “watch this” frame. No intro card, no “hey guys,” no five seconds of taxi. The hook is the first frame.
Pacing for Shorts: a cut or camera move every 2–4 seconds. Alternate sources: glasses POV for the feel, X2 reframed wide for the context, X2 close on the panel for the instruments. Same scene from two angles reads as intentional, not repetitive. Length targets: 30–60 seconds is the sweet spot for Shorts, Reels, and TikTok, hard cap 60 for Shorts. A debrief cut can run as long as the lesson needs and stays private.
Reframing the X2 — the 360 superpower. The X2 file contains the whole sphere. In the Insta360 Studio app (or the plugin for Premiere/Resolve) you set keyframes that steer a virtual camera: start wide on the cockpit, push in on the panel for the airspeed callout, swing out the window for the view. Two angles per scene, maximum — more than that feels like a theme-park ride. Let each angle breathe 3–5 seconds before cutting.
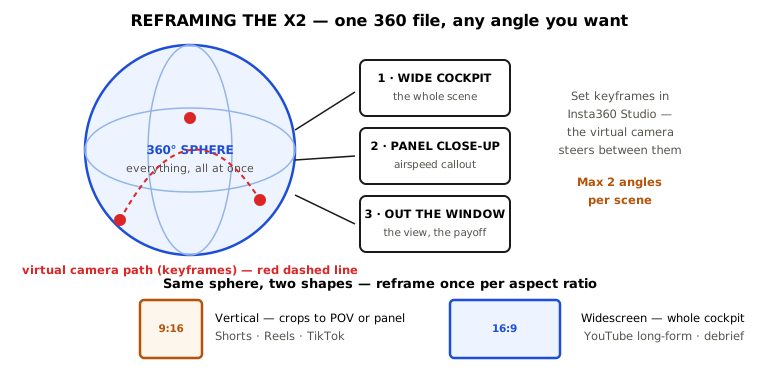
The tiny-planet opener: one 2-second tiny-planet shot at the very start is a recognizable hook for aviation content. Use it once per video, never as a crutch. And export the reframe first, then edit: reframe the X2 clips to flat video files (16:9 for long-form, 9:16 for Shorts) before they go into your main timeline. Editing raw 360 files in a normal timeline is slow and error-prone.
Audio mix — cable audio is the star. Levels: cable audio at full, clear level. Normalize dialogue to around −14 LUFS (the loudness social platforms target) so it isn’t quiet next to everything else in the feed. Cut the rumble: a high-pass filter around 150–200 Hz takes out most engine drone without touching voices. Don’t overdo it — voices get thin below that.
Music, if any: licensed music only, sitting at least 15–20 dB under speech. Music goes under, never over, a radio call or a CFI instruction. If speech and music fight, the music loses — cut it out for that section. And cut the long silences, the checklist mumbles that add nothing, and any audio that identifies someone who didn’t agree to be posted. When in doubt, cut it.
Captions — non-negotiable for Shorts. Most Shorts viewers watch muted at first. Burned-in captions (rendered into the video, not platform toggles) work everywhere the clip gets reposted. Auto-caption, then fix: auto-captioning gets aviation wrong every time — “KAPA” becomes “capa,” “squawk” becomes “squash,” callsigns get mangled. Read every caption against the cable audio and fix the terms by hand. Style: big, high-contrast, centered-low, 2–3 words per line, changing on the beat of the speech. Yellow or white with a black outline reads over sky and panel alike.
Color — cockpit light is brutal. Bright sky through the window, dark panel below. Uncorrected footage is either blown-out sky or a black panel. The fix, in order: bring highlights down until the sky has detail, lift shadows until the panel is readable, then add a touch of saturation. Don’t chase a “look” — readable beats cinematic. And match your sources: glasses and X2 render color differently. Pick one clip as the reference (usually the glasses POV) and match the X2 reframe to it, not the other way around.
Export and publish
| Destination | Format | Notes |
|---|---|---|
| YouTube Short | 1080×1920, 9:16, 30 fps, H.264 | 60 seconds max. Title + first frame do the work — the title is the hook in text form. |
| Instagram Reel / TikTok | 1080×1920, 9:16, 30 fps, H.264 | Same file as the Short usually works. Re-check captions — TikTok’s UI covers the bottom ~15% and right edge. |
| YouTube long-form / debrief | 1920×1080, 16:9, 30 fps, H.264 | Debrief cuts stay unlisted or private unless everyone in them agreed to public. |
One master, many cuts: export a high-quality master of the locked edit first, then make the platform versions from it. Never re-edit the timeline per platform. Thumbnails (long-form only): one frame from the video with 3–5 words of text, max. Shorts pick their own frame — make sure your first frame is thumbnail-worthy.
Before you post, watch the whole thing once on your phone, with sound off, then once with sound on. If it doesn’t read muted, the captions aren’t done. If a callsign, a face, or a voice is in it that didn’t agree to be posted, it doesn’t go up. Air-traffic communications are public broadcasts and are routinely published in aviation content, but keep it tasteful — no clip whose point is embarrassing a controller or another pilot.
Checklists
Pre-flight (ground only)
- ☐ All batteries charged, X2 card formatted, glasses case charged
- ☐ Lenses clean (glasses + both X2 fisheyes)
- ☐ 10-second test clips played back on both cameras
- ☐ “Hey Meta” off; glasses on highest video quality; X2 at 5.7K 360 / 30 fps
- ☐ Phone recorder at highest quality; cable levels confirmed moving
- ☐ CFI/passenger told you’re recording; school OK with mounts
- ☐ X2 mounted + tethered + tug-tested; cable routed clear of all controls
- ☐ Glasses first, headset over them, headband one click loose
Recording (set-and-forget)
- ☐ Audio recorder started first, left alone
- ☐ X2 started second
- ☐ Glasses first clip before takeoff call
- ☐ Marker: two panel taps + spoken slate
- ☐ New glasses clip per segment; nothing touched below 1,000 ft or in the pattern
- ☐ After shutdown, stop in reverse: glasses → X2 → audio; verify all files exist
Post (per flight)
- ☐ Files into
YYYY-MM-DD_lesson/audio | glasses | x2 - ☐ Cable audio on the timeline first; auto-sync by waveform; verify with the marker tap
- ☐ Mute (don’t delete) camera audio only after sync is locked
- ☐ Rough cut: one idea, hook in the first 2 seconds, cut every 2–4 seconds
- ☐ X2 reframed (9:16 for Shorts, 16:9 for long-form), tiny planet at most once
- ☐ Audio: high-pass ~150–200 Hz, normalize dialogue, music 15–20 dB under speech
- ☐ Captions burned in, aviation terms hand-corrected
- ☐ Color: highlights down, shadows up, sources matched
- ☐ Watch once muted on the phone, once with sound; consent check before posting
- ☐ Export master first, then platform versions
Gear notes: Ray-Ban Meta Gen 2/3 video is 3K; continuous recording runs roughly 45–60 minutes with heat buildup after ~20 minutes straight. Insta360 X2 shoots 5.7K 360 and its files run large — check card space before every flight. The glasses have no mic-off recording mode; camera audio is kept only as a sync reference and muted after sync. All of this assumes your school and CFI are on board with recording and mounts in a training airplane.
Photo: Matt Skidmore